

Checkout / Cashier
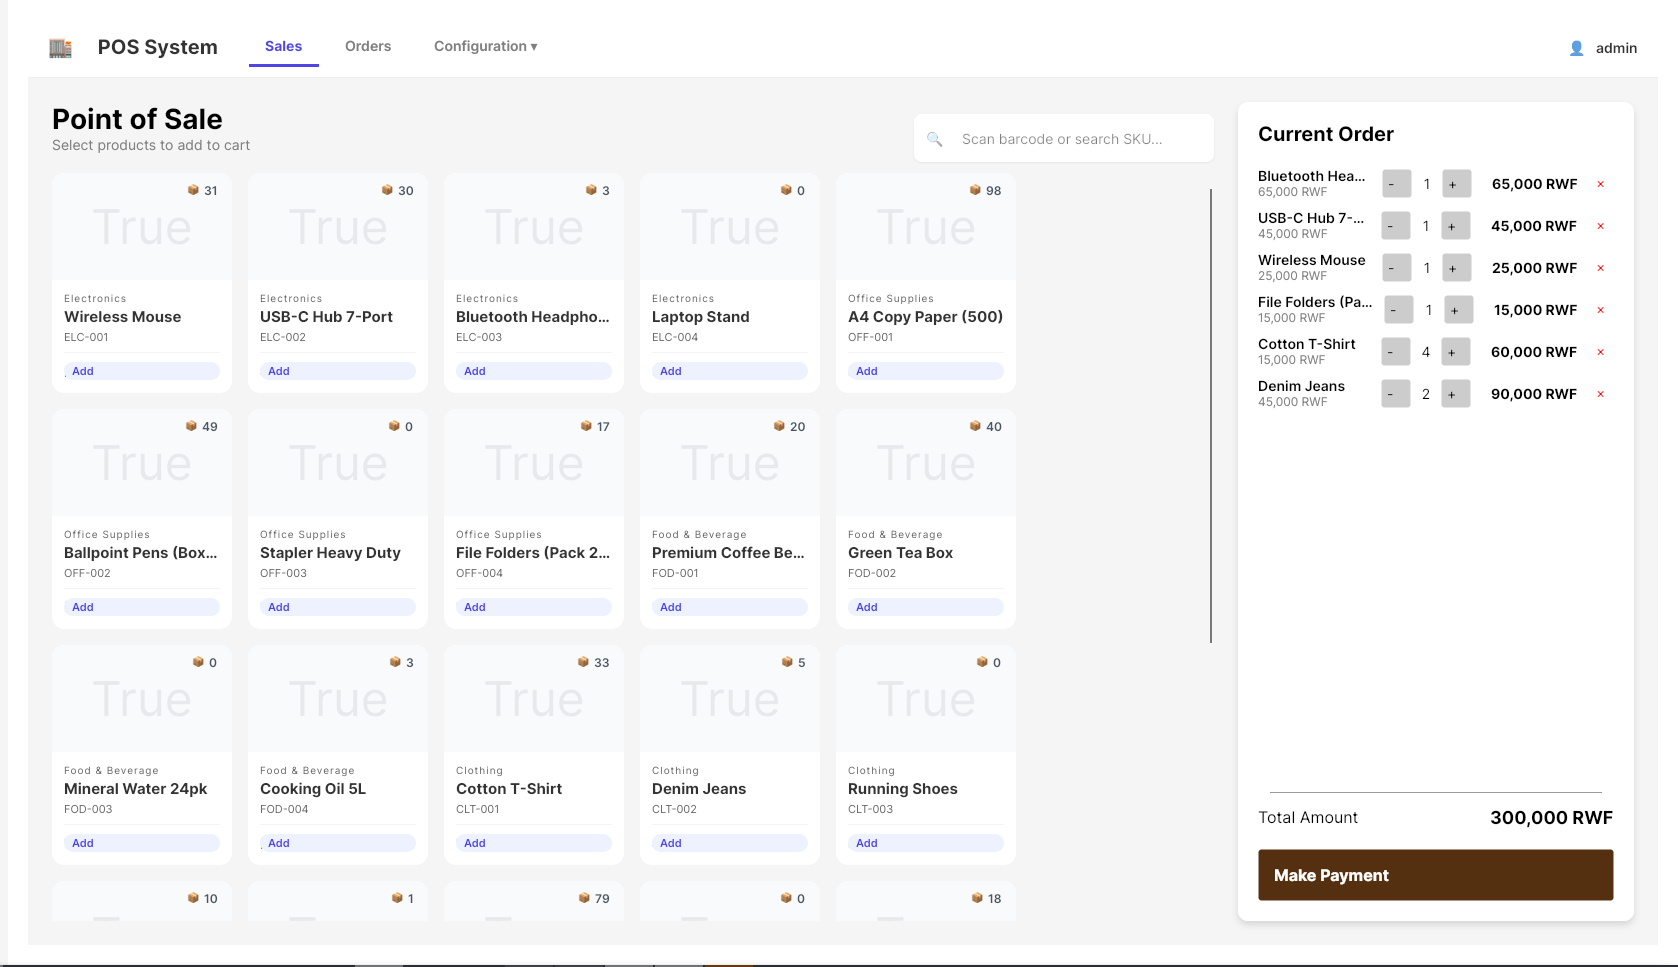
Use Checkout / Cashier (POS) to sell at the counter: open a register, scan items, take payment (cash, mobile money, or split across several methods), and print a receipt.
Before you start
- License is Medium, Pro, or Enterprise (tiers)
- Your user role allows Point of Sale
- At least one product is available for Point of Sale
- At least one payment method exists (see Configuration below)
Steps
1. Open a register
Every shift starts with an open register — you cannot ring up a sale without one.
- Click Checkout / Cashier in the sidebar.
- If no register is open, an Open Register screen blocks the rest of POS. It won't let you through until you open one.
- Enter the starting float for each payment method listed (e.g.
50000in Cash if that's what's physically in the drawer,0for Mobile Money if you're starting fresh). - Click Open Register.
Once open, the header shows Register: SESS-{date}-{number}, plus Cash In, Cash Out, and Close Register buttons for the rest of the shift.
2. Add products to the sale
- Use search: watermark Scan barcode or search SKU...
- A barcode scanner works from anywhere on the Sales screen — you don't need to click into the search box first, as long as you're not actively typing in another field (customer search, tender amount, etc.). Typing a name still requires clicking into the search box, since that's a deliberate search.
- Scan or type, then add the product (tile Add).
- In the cart, adjust qty with − / +, or remove with ×.
- Line prices are editable — click the price shown under a product's name in the cart and type a new amount if you need to give a discount or correct it on the spot.
- Watch the total update as you go.
3. Take payment (single or split)
- Click Make Payment.
- On Payment details:
- Optional: choose Customer (Search or select customer...) or click ➕ to create one
- Optional: tick Auto Create Invoice
- Set Checkout Currency if shown
- Add one or more tenders — a sale can be paid across several methods (e.g. part cash, part Mobile Money):
- Choose a Payment Method, enter an Amount, click Add Tender.
- Repeat for additional methods if the customer is splitting payment.
- Watch Total Tendered and Still Due — the sale can't be completed while anything is still due.
- Click Validate Payment once fully covered.
4. Finish the sale
- On success you see Payment Successful! and receipt details.
- Click Print Receipt if needed, then Close.
- Start the next sale on the Sales tab.
5. Cash In / Cash Out during a shift
Use these for money movements that aren't sales — topping up the float, dropping cash to a safe, petty cash out.
- Click Cash In or Cash Out in the header (visible whenever a register is open).
- Choose the Payment Method the movement affects, enter the Amount and a Reason (e.g. Cash drop to safe).
- Click Confirm.
These movements are tracked per session and factored into the closing reconciliation automatically.
6. Close the register at end of shift
- Click Close Register in the header.
- For each payment method you'll see Opening, Sales, Cash In, Cash Out, and a calculated Expected balance.
- Physically count what's actually in the drawer / mobile wallet for each method and type it into Counted. The Difference column updates as you type — it should read
0if everything matches. - Add a note in Notes if there's a discrepancy you need to explain later.
- Click Confirm Close.
A register must always be open to sell, so closing one immediately prompts you to open the next.
7. Review past POS orders and sessions
- Open the Orders tab.
- Use the Orders / Sessions toggle at the top:
- Orders groups sales by customer — click a customer to expand their orders, then View Details on one, or Refund to process a return for it (see Returns & refunds).
- Sessions lists every past and current register shift — click one to see its full balance reconciliation and every order rung up in it. Use Export to Excel to save that session's data.
- Search either view with the box at the top (customer name or order/session number).
8. Configure payment methods (admin / manager)
- Open Configuration ▾ → Payment Methods.
- Under New Payment Method, enter Method Name (e.g. Mobile Money), then search for and select a Journal (type to filter, click Select).
- Click Save Payment Method.
- Delete unused methods from the grid with Delete.
9. Create a customer during checkout
- On payment, click ➕ beside Customer.
- Fill Customer Name (required), Phone Number, Email Address, Address.
- Click Create.
What success looks like
- Register is open before anyone tries to sell
- Cart total matches the goods, prices reflect any adjustments made
- Validate Payment shows Payment Successful! once tenders cover the total
- Stock decreases for the sold items
- Order appears under Orders, tagged to the session that was open
- Closing a register shows Difference: 0 for every method when the count is accurate
If something goes wrong
| Problem | What to try |
|---|---|
| Can't get past Open Register | Enter an opening balance (0 is fine) for at least one payment method |
| Sidebar opens License instead | Tier too low — upgrade to Medium+ |
| No payment methods | Add one under Configuration ▾ → Payment Methods |
| Validate Payment stays disabled | Check Still Due — add another tender until it reaches zero |
| Product missing in search | Ensure product has Point of Sale enabled in Products & Stock |
| Barcode scan doesn't add the item | Make sure you're on the Sales tab with no payment/refund modal open, and not actively typing in another field |
| Closing balance shows a Difference | Recount the drawer/wallet for that method, or check for an unrecorded Cash In/Out |