

Products & stock
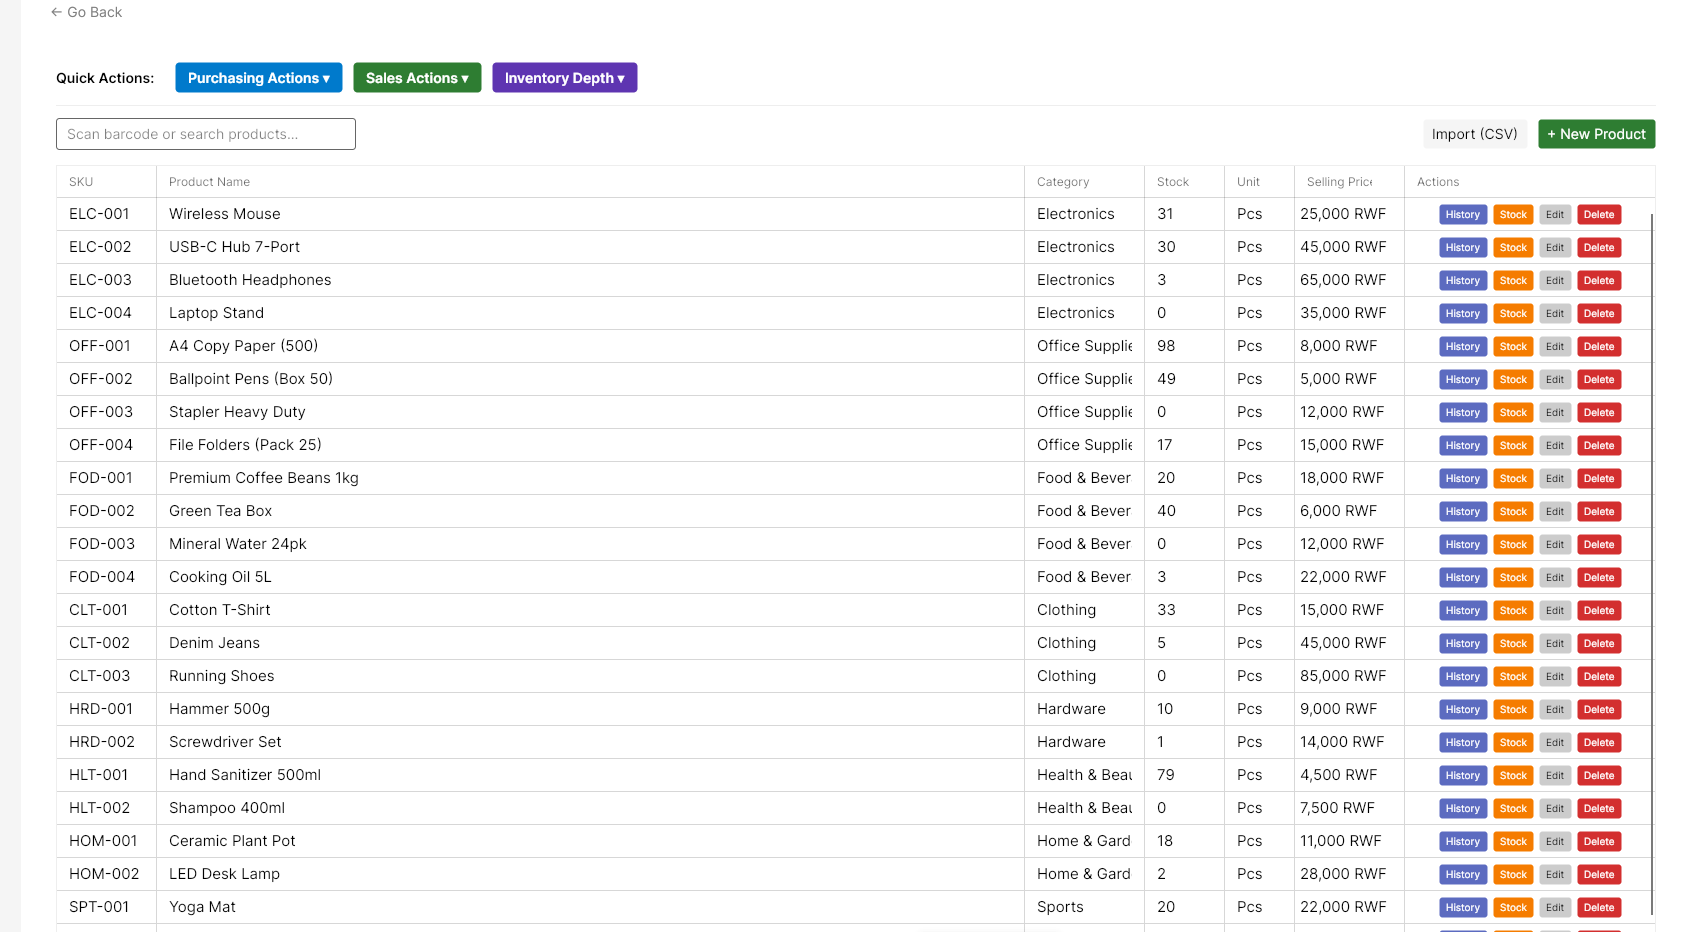
Manage your catalog and quantities under Products & Stock. This screen is also the hub for Buying, Selling, and Stock Tools menus.
Before you start
- Sidebar shows Products & Stock (your role allows inventory)
- You know product names, selling prices, and optional barcodes/SKUs
- Basic tier has a product limit — see License tiers
Steps
1. Open Products & Stock
- Click Products & Stock in the sidebar.
- Use the search box: watermark Scan barcode or search products... (type a name or scan a barcode, then Enter).
2. Know the Quick Actions menus
| Menu | Items |
|---|---|
| Buying ▾ | Ask Supplier for Price, Orders to Suppliers, Suppliers |
| Selling ▾ | Price Quotes, Customer Orders, Customers |
| Stock Tools ▾ | Stock Counts, What to Reorder, Demand Forecast, Store Locations, Damage / Loss Write-off |
3. Add a new product
- Click + New Product.
- On General Information, fill at least:
- Product Name (e.g. Premium Wireless Mouse)
- SKU / Barcode (optional but recommended)
- Sale Price, Cost, Category, Unit of Measure
- Initial Stock Quantity if you already have stock
- Tick Sales / Purchases / Point of Sale under Services Availability as needed.
- Optional: open Accounting to pick Income Account / Expense Account.
- Optional: Additional Fields for custom data.
- Click Save.
4. Edit, stock-adjust, or delete
On each product row:
| Button | Use |
|---|---|
| Edit | Opens Manage Product |
| Stock | Opens stock adjust for that product |
| History | Product Transaction History — movements, journals, and the replenishment forecast |
| Delete | Removes the product (confirm carefully) |
Adjust stock on a product
- Click Stock on the row (or open the product and use stock fields).
- Set Stock Change Type, Quantity, What it cost you, Selling Price, Reason.
- If the product is lot/serial tracked, fill Lot / Batch Number, Expiry Date, and/or Serial Numbers (comma-separated).
- Click Save.
5. Check the replenishment forecast
Open History on a product to see, beyond its raw stock:
- On Hand — what's physically in stock right now
- Incoming — quantity still due on open purchase orders, including Draft/RFQ ones not yet approved
- Outgoing — quantity still committed on open sales orders, including Draft quotations
- Forecasted Available = On Hand + Incoming − Outgoing
Click Incoming or Outgoing to see exactly which purchase or sales orders make up that number, then click any of those rows to jump straight to that order's details.
6. Import products from CSV
- Click Import (CSV).
- Choose your file and wait for processing (Importing Products...).
- Read Import Summary, then click Dismiss.
7. Create helpers on the fly
From product forms you may open:
- Units of Measure → Create New Unit
- Create New Category
- Create New Sales Tax
Fill the prompted fields and save, then continue with the product.
What success looks like
- Product appears in the grid with correct Stock and Selling Price
- Barcode/SKU search finds the item
- Stock History shows your adjustment
If something goes wrong
| Problem | What to try |
|---|---|
| Cannot add more products | Product limit on Basic/Medium — upgrade tier |
| Barcode scan does nothing | Click the search box first, then scan; press Enter |
| Lot / serial required | Enter Lot / Batch Number or serials before Save |
| Wrong stock after import | Open History, then correct with Stock adjust |
| Menu item missing under Stock Tools | Module or tier not enabled — Admin → Settings → Modules |